
Bunting is a fantastic home decoration that is coming back into fashion, and it can be brought out on any occasion or just hung about your house year round, for me this will probably live on a huge blank wall in my kitchen.
So often people dive in head first and end up scared off because the spectacular frock they envisioned in their mind is nothing like the interesting ... thing they've created. It can be really disheartening so this is why I encourage simple projects to start off with.
Want to make some bunting? After the jump.
You will need:
Sewing Machine. Too tedious to do by hand.
Coordinating Fabric. You can use scraps and have each flag different if you'd like, in my version I have bought half a metre of quilting fabric (lots of fun prints to play with!) in 5 different prints. Half a metre produces at least 10 flags of each print.
Matching Thread. Due to my fabric choices I used white for all of them for simplicity and so I didn't have to change thread.
Bias Binding Tape. You will need at least a metre per 5 flags (depending on how you space them) plus around 70cm for each end for tying up purposes. White is the classic colour but feel free to take creative license!
Thin Cardboard. Cereal boxes are ideal.
Scissors. Both paper and fabric cutting variety.
Tailors Chalk. Or another fabric marker that will show up on your fabric.
Optional:
Cutting Wheel and Ruler. An easy way to cut straight lines.
Point turner. For extra crisp points in your flag.
Step one:
Create your flag template. Draw up a triangle on the cardboard With a base 16cm wide, and two edges 22cm long. Cut this out.

Step two:
Use this template to mark out triangles on your fabric, the way I've marked the fabric below is the most economical way so you'll get more flags. (Tip! if you want diagonal lines from stripy fabric, mark on the bias, you will get less flags though.) Cut out your flags.

Step three:
Pair each flag with another in the same print, and place them right sides together, keep them in a stack and try not to loose any!

Step four:
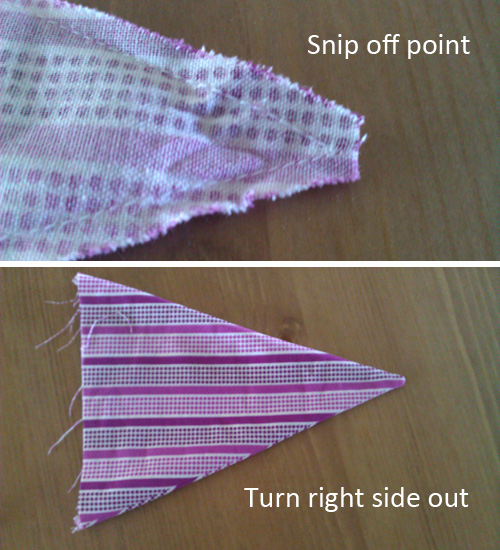
Take them over to your sewing machine and sew the pairs together along the long edges using a 5mm seam allowance. Lift the foot up and pivot at the point for a crisp corner. Chain all the flags one after the other to save time.


This is how they will look connected.
Turn all the flags right side out and push the points out as far as you can, a point turner is ideal just try not to shove whatever you're using through the seam! I found the blunt corner on a pair of nail clippers can help. Press them all flat.
Step six:
Sew a topstitch along the long edges, this will keep them in place, even if you wash your bunting (in a lingerie bag!)

Step seven:
This is where your bunting starts to take shape! Press your bias tape in half down the length. Then pin your flags in place so the short edge is sandwiched in the tape. Leave the same gap between all the flags, and don't forget to leave a length to tie it up with!

Special binding tape foot, helpful stuff.
Step eight:
Sew the edges of the tape along the entire length, removing pins as you go. It's also a good idea to give it a fnal press before you hang it, things can get a little rimpled in the sewing process.

And you're done!
Please show me what you come up with if you give it a try.